Dwarf Kingdom & Land of the Giants
You will travel between these two maps as you approach the end of the game.
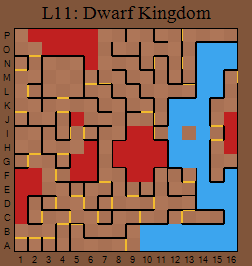
You enter the Dwarf Kingdom at I11. In front of you is the River of Eternity. We were told earlier that it saps 1/4 of your health each step, and you can't heal. A message here says that only the bravest adventurers explore the life-draining River of Eternity for hidden passages. Luckily there is a block in the river at I13 so make your way east to dry land. There are two doors. One leads to big fights against gangs of Phantasms at F15 and G16. The other takes you to a door at M16 to the Land of the Giants. Bellows from gruesome monsters echoing through the cavern aren't encouraging! Go through to the Land of the Giants.
Land of the Giants
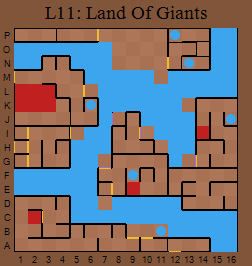
Entry is at M1 which takes you back to the Dwarf Kingdom. A message on the wall at N3, in runes, translates to tell you that you must acquire the Sunbeam Key at the Dwarf Ceremonial Rock to access the Dwarf Kingdom.
Go through through the door at L5 and zip across the River to N8. At O10 you meet a group of Dwarves at the ceremonial Dwarf Rock who offer to swap your blue metal for the key to their Kingdom. Take it and you will find it's the Sunbeam Key. Through a series of appearing / disappearing walls behind the door at N10 you will find the Jasperstone Fountain which restores your health at P12 and the Venivor Fountain to restore your mana at N13.
Behind the door at P7 is a hard fight against Basilisks, dragons and Incubi at P6, another against giants at P5, and Death Leeches, Basilisks, Gargoyles, Liches and Werebears at P4.
Moving from safe slab to safe slab, make your way across the river to G13 and cast Detect to find a secret door. A message at K15 says the Tapestry of the Moons requires a spectrum of colour to open. The Omar Fountain at J16 restores your mana and at J14 Phantasms and Incubi must be fought to gain a green tree-shaped tree, the Elfin Cave Key. Use this to enter the Cave of Needlewood.
Head over the river again to find another secret door (cast Detect) at I10. Runes at H8 tell you it is rumoured that dwarves can build magnificent creations and vessels out of golden threads. Head back to the Dwarf Kingdom and across the River to F13. The Sunbeam Key unlocks the door and vanishes. I don't think the door should be visible until you have the key from the message given - a buglet? The King of the Dwarves sits on a chair at N3 and tells you of a gem of great value behind the keyhole lava, guarded by a dragon. Kill the beast and you can have the gem! It's over the Keyhole Lava and we'll be off there soon.
At F7 the west wall bursts with colour and a voice says, I demand from you a token of worth ... something that will decrease the value of your purse ... simple yet valued as is the lining of every cloud. The west wall at I7, and the two locations below say, start with my most southern brother. You must proceed from south to north to complete this simple phase. So more tasks lie ahead. This is clearer after visiting E9 where a voice booms that the westward corridor will tell you of a way to cross this path. Seek the walls that speak. Heed them well. Do as they ask from south to north and you shall find the ingress of safety south and east of where you are. Another message at G4 says the Keyhole Lava lies at the centre of this Kingdom. Give the greedy walls that which they request and the way across the lava will be clear. A third at D2 says The Keyhole Lava lies at the centre of the Kingdom. Activate the switches to the west one at a time from south to north. So go to the first wall at F7 and give a silver bar. It says, onto the next sacrifice.
Now to the wall at G7 wants a simple blade of steel or iron. A halfling's sword, small in stature. Buy a short sword at the shop and give that. The one at H7 wants a young thief's tool. Buy a green lockpick and give it. The last one, at I7 wants a dead King's key! So it's back to Level 1, the Mines, to get King Cleowyn's Key from the Raptors at N6! Note you DON'T need another Sunbeam key (cheers, Graham!). Give King Cleowyn's Key to the greedy wall and you're told to go to the lava south and east of here where the way is now clear. A door to the keyhole lava has now appeared at D10 and when you walk through there, platforms have raised over the lava. There are tough fights over here against either groups of Basilisks or King Goblins and Hobgoblins, or gangs of cyclops and Manticores. Make your way to P16 - the Dragon's Lair. He isn't there on his own, however, he has Manticores, King Goblins and Basilisks with him! But the glow of the red gem in the room should spur you on. If you're really unlucky, there may be two dragons there! I succeeded on Level 41 and won, among other things, a Rainbow Red.
A note at N1 tells you that 4 gems and a gold boat will get you to eternity. At H1 you meet a blacksmith who wants you to get rid of the cyclops in her gold caves who thinks he is the King of the cyclops. Cast Detect east in this room at I2 to find a secret door and the Cyclops' Mine Key at I6. Head to the Land of the Giants and at J8 the key makes the tapestry in this alcove translucent, opening new passages to the southwest. Go west through the wall.
Go to the one-way door at I5. A teleport in the room at H1 leads to P3 and one at P1 goes to J1. There is a very hard fight against Manticores and Dragons at J3 and the King Cyclops (and his gang) are at K4. When you kill him, you win the Cyclop's head! Return to the blacksmith and she is very grateful and weaves you a golden boat from threads, which she says can ride the rainbows.
Again from the tapestry at J8, head down the river to G7 and heal. Cast Detect to find a hidden door south. The RockyFlat Fountain at F9 restores your health. At F10 you fight Phantasms and Incubi for a stone key, the Dwarf Mine Key. At E7 the Hidden Mine Key makes the south wall transparent.
Make your way to safety over the river at B9. Your mana is restored by a whirlpool at B11. A teleport at B8 takes you to D13 where there is a hidden area. Here you get a message from the Zephyr Wind at E12 that only the FlexSword can bend against the Wind Elemental's gale. Another at E13 takes you to B2 while the ones at D16 and E12 take you to B2, and one at F16 to a new area at A14 where a door at A12 leads to Rivers End.
There is a hard fight at D4 against Dragons, Giants and Tyrans, and another against a band of assorted adventurers slaying a dragon at A1. (The dragon attacks you too which I thought was a bit unfair!)
A dwarf blacksmith, a wizard swordmaker, at E5 will make a weapon from your finest metals. Take her the flex metal won at L7, C14.
She makes a Flex Sword and dubs it the Wind Sword - may it destroy your enemies at first blow.
An apprentice miner at A2 gives you the Hidden Mine Key to his mine hidden beyond the edges of the waters. Monsters have forced him from there. If you can do him a favour, he will replay you well some day. Clear River's End to gain 3 platinum bars.
Find a secret door at C5 by casting Detect south and cross the River of Eternity to the door at C12. There is a gang of Phantasms at C14! If they petrify you, you are sunk! I found the best thing was to cast Control several times, then use Death Darts. The Fountain of Attributes past them at C15 increases your powers.
River's End
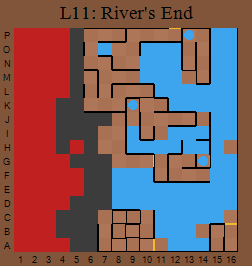
Entry from the Land of the Giants is at P12. Dragons defend their lair in company with Gargoyles and Spit Spiders at P9. Cross the River by moving east from M 9 to M13. At P12 the Minotaur Fountain restores your health and mana (handy!). Cross again from M13 to J14 and from J14 to I11. The SageCross Fountain at K9 also restores your health and mana but the only way out is along the River. There is a very hard fight against Werebears, Hellhounds and Were Minotaurs at L10. Pray they don't control you! Ditto at M7.
Then go by River from I11 to G11. A fight at F11 is all you find. Then back along the River to I11, then J14 and thence to G13. Hop round to G14 where Dragon Breath Fountain increases your attributes. Runes here say Past the platforms a tapestry you will find, Illuminate the moons with the spectrum of the Moon Prism, the rest is smeared with blood.
From F14 enter the river and swim to a teleport platform at I16 which takes you to B15. Here a brilliant tapestry depicting moons decorates the room. Use the Moon Prism and a door appears where the tapestry was. Walk through and north to C16, then along the River to B14, and then to A11 where you find the door to Voranti's Treasure.
This looks like a long passage but walls form behind you and there are some complex fights against gangs of baddies. At C7 a gnome thief tells you that you are very near the final battle with En-Li-Kil. The four Rainbow Gems will light your way to the infinite beyond when they are all placed. Red, yellow, green and blue are the rainbow colours. Have your boat when the gems are set and sail the rainbow to your destiny.
Once you have cleared this area (I assume the whole of River's End) return to the dwarf miner who gave you the Hidden Mine Key to receive the reward of 3 platinum bars - which, unfortunately, I had to leave behind as I was carrying too much!
But, onwards and upwards! Cross the river from C10 to G10. At G8 is a statue that appears capable of holding a gem. Remembering the order given earlier (red, yellow, green, blue), use the red gem. A beam of red arcs over the Ageless Void. Then move one location north and use the yellow, another north and use the green, then one north again and use the blue (this is at J8). A vibrant rainbow of colour forms.
Use the boat. It floats out of your pack on a swirl of magic dust, intersects the Rainbow and bursts into blinding light. Once your eyes adjust, you see an enormous golden boat bedecked with the rarest jewels and finest carvings. A rainbow voyage across the Ageless Void awaits you to the west. Move over the platform to I6 and onto the boat. The Zephyr Wind blows a light breeze from the east and the boat sails across the rainbow. The Zephyr tells you that only the FlexSword can remain in your hands when you encounter the Wind Elemental. Destroy him and the way to En-Li-Kil's domain will be clear. You arrive at an island in the centre of the void, on the ...
Island of Eternity
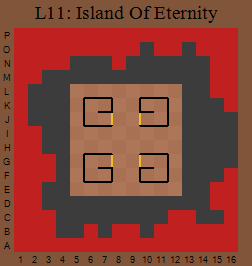
Carry the Flexsword from now on! You arrive at L12 and fight Elementals in each of the four small rooms. Start with the fight at K10 and, after you win, walk through the west wall to another dimension - Level 12: The Unknown. There are continuous hard fights here on each square and you'll find some rare treasure but will probably, like me, be too weighed down with keys and gems to pick any of it up! Arriving at the end you press a Timeswitch and can walk through the north wall to return to the Island of Eternity, H9.
Do the same after the fights at F10 and K7, fighting your way through and setting a Timeswitch again in each case.
En-Li-Kil and his cronies are at G8 but he vanishes, leaving you to fight the Elementals, including the Wind Elemental. Luckily he can be controlled. Once you complete the fight past them at F7, walk east through the wall to enter the end game.
The Unknown

En-Li-Kil taunts you as you arrive. Don't leave the pathway until you meet him face to face or you will need to retrace your steps. This is why you must do this section last. Do it too soon and there is no escape. But if the three switches are set, you can cross the water over a platform which will have appeared at E7. You cross the Waters of Death safely. En-Li-Kil stands guard at the other side, protecting the Fountain of Life. This was the goal Arnakkian Slowfoot sought.
At G7 you meet En-Li-Kil himself with his entourage of Tyrans, King Goblins and Werebears. He tells you that your arrival frees him from his long imprisonment between two worlds. You will fail, he says, as Arnakkian did. Then he will search out and destroy all mortals in your world. Strangely, I killed him with one blow - mind you, it WAS worth a mighty 10110 damage!
At H7, you reach the Fountain of Life. The Rainbow Gems and Golden Boat dissolve in the golden water. You have defeated the Time Elemental En-Li-Ki. You have won the game of life and death. You are now a HERO OF YSERBIUS. Return to your home safely now. Soon you will be able to leave the volcano Yserbius and begin a new life of adventure.
Farewell ... this ending is just the beginning.