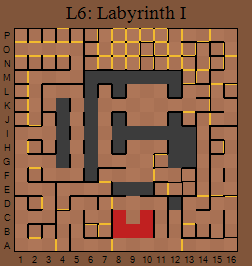
Labyrinth Route 2
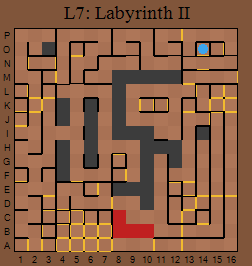
There is a pit at I11 in Labyrinth I which drops you to I11 in Labyrinth II. This is the so-called Mages Overlook where, we're told, Mages found the plateau useful for looking out over the labyrinth denizens following the great cataclysm. Making your way to K10 will lead you to a one way tunnel which will take you back to Level 6 Labyrinth I, arriving at K10. But we're going to the door at M16. This is marked with runes which tell you that runes can be the most powerful of weapons in the hands of an adept wizard. Here the runes also protect the great mage's magical possessions against the unwanted. Going through the door will take you to the Castle Wizard Room.
Castle Wizard Room (Spelling Puzzles)
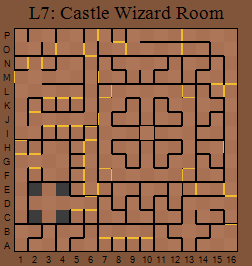
A gate leads back to Labyrinth II at M1. This area is a real swine! There are many walls with runes on them. These translate to words like Druid, Ethereal and Nexus. Walking into the wall will teleport you, sometimes to another area with more rune-covered walls, sometimes to a location in the main area that you could already get to and which has monsters in it or between you and the exit!
You will be told that those which haunt the castle must be spelled to find their master - list the rune words and the initial letters of some routes spell names of monsters and important characters. For instance:
1. From N3, go East (through DRUID), N to N7 (RUNES), West to M11 (ALCHEMIST), S to M13 (GHOST), West to M14 (ORB) and South to G16 (NEXUS) to spell DRAGON, taking you to A14. There are three moderately tough but lucrative fights in this corner.
2. From K2 go N (through GHOULS), N to K9 (HEX), E and through the north wall to F15 (OBSESSION), W to I14 (SORCERY), W and N to L14 (TALISMAN) to spell GHOST, taking you to D3. There are four pits round D3. This leads to a corridor with several rooms off it. The door at E7 has a bad fight behind it, against banshees and ghouls.
3. From I4 go S (through ETHEREAL), S to D12 (NETHERWORLD), N to D11 (LUCK), S to D10 (ILLUSION), taking you D13. Go south and west to B12 (KARMA) which takes you back to E10 and going S to D10 (now it spells INVULNERABLE) and S through here now takes you to C9, then N to D9 (LUMINOUS) to J11 spelling EN-LI-KIL. There are two very hard fights against Basilisks at K11 and J12. In both locations you are told, those which haunt the castle must be spelled to find their master. Killing either lot tells you the gate takes you back to the labyrinth and, indeed, going east from J12 or north from K11 takes you back to M1.
4. From K5 go south (ALCHEMY), E to H12 (REVERIE), N and E to N11 (NETHERWORLD), S to A1 (ARCANE), N to B3 (KARMA), W to A5 (KARMA), S to A4 (INCANTATION), arriving at D13. Now head to C15 where a new teleport will have appeared while spelling this (ARCHAIC), taking you to A11, N to B11 and go east (NETHERWORLD) spelling ARNAKKIAN and arriving at H9 where you'll find two hard fights at H8 and G9 against Basilisks and King Goblins and a message that the Gate takes you back to the Labyrinth so, again, if you go west from H8 or south from G9, you end up back at M1. You are also told that secrets follow when you spell that which powers time (referring to spelling En-Li-Kil above).
You'll also learn from a scroll that to gain access to Arnakkian's chamber, you must defeat his lich apprentices. The third message obtained is, beyond the words lie the power of the earth. The master of this castle must be identified before the ghost may take you to him.
One you have done both the Arnakkian and En-Li-Kil routes, going to the door at I6 you are told that both Arnakkian and En-li-kil have been identified and the Ghost takes you to the Guardians. You are transported to Castle Parapets at K6.
Castle Parapets
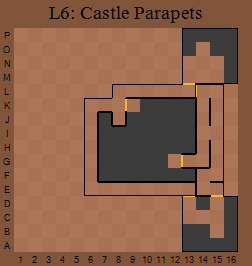
At K6, runes on the wall tell you 'yellow light from a yellow gem' and at E13 an outline picture on the wall shows a wizard crossing an enormous plane of nothingness.
The Earth Elemental holds power over the door at L13. We'll come back here in a minute.
At K9 you find the entrance to the Endless Void. A chasm is between you and a distant platform. A voice whispers that only golden rays with melodic tones will allow you to bridge the gap of time. The ritual must be performed correctly and you must complete it. Remembering the runes and picture, use the Rainbow Yel (yellow gem) and a mystical golden haze floats over the void, waiting ... use the Harvest Horn and the haze forms into a solid path. A voice bellows 'It is done!'. Cross in safety to G12 and go through the door.
There is a hard fight against a gang of dragons at G15 but, through the door at E15, you enter the Earth Elemental Palace, filled with a bounty of priceless gems. It seems to shake with great power. The Earth Elemental Andreas is on a mountainous perch surrounded by Tyrans, Manticores, Basilisks and Dragons at C15. Get onto the next square as Andreas and he stops attacking you. Use Control, then slug it out, healing if you can. You win Infinite Armor, a war hammer and Nature's Robe.
Go back to the door at L13, Andreas no longer defends it. Inside, En-Li-Kil's Phantasm Guardians stand watch over the entrance to Arnakkian's Tomb and you'll fight them at N14. Once they are defeated, moving to O14 causes a magic field to teleport you to Arnakkian's Tomb in the center of the Castle Wizard Room.
Castle Wizard Room (Arnakkian's Tomb)
The laughter of the archmage fills the corridor when you arrive at I7. Doors appear and disappear in the corners where you'll meet gangs of Basilisks and Liches. In the centre, the square at I10 is surrounded by four doors each marked with the symbol of the four corners. Work your way from corner to corner, starting from the top left (L7), thence to L13, F13 and F7. Walk north, turn towards the centre and go east up to the wall at I9 and the Wizard Door opens. Inside is the spirit of Arnakkian Slowfoot and a gaggle of Liches. A very hard fight! But you will be rewarded with a Rainbow Blue gem.
The Labyrinth Thieves
Collect a Harvest Horn and, once again, make your way through Sirocco's Door and Zephyr's Door, past the lava to Zephyr and through the door at B12. Through the door at C14 is a very hard fight. When you enter, the Zephyr Wind whispers, I have taken the Harvest Horn and I give you something to help you defeat the Wind Elemental. After the fight, you get some flex metal.
Go along the corridor (the Corridor of Zephyr) to the door at J15 which, you're told, is the gateway to the Secret Chamber of the Labyrinth Thieves. It sounds lucrative, and it is!
You'll teleport in at J15. There's a secret wall south from M16 and a fight behind it. This northern area, The Secret Chamber of the Labyrinth Thieves, has several secret doors and false doors - they look like doors but you won't be able to walk through them. Several times you will find yourself trapped in a one way route and going in the opposite direction from the way you want!
A secret wall at P7 leads west to the Thieves' Shrine where you will gain the pickpocketing skill. A major fight at O6 will gain you the Wind Knight Key and a message nearby tells you that beneath each pit is a floor or another pit; fall through the floors to find more passages. Nothing ventured ... drop into the pit at N6 to discover Torbriar's Treasury on Level 7, Labyrinth II. On arriving here, at M6, you are told the treasury was built by the knights to celebrate WarMaster Torbriar's victory over the armies of ogres and trolls. There are several fights against Manticores and Nightmares along this corridor and at a few locations the wind is nasty and causes 100 damage. Finally at N14, use detect north to find a secret door only visible to knights and, behind it, Torbriar's Fountain which gives you the martial arts skill. NB I don't know what other classes find and I couldn't enter the room at N15.
Level 9 - Arnakkian's Arena
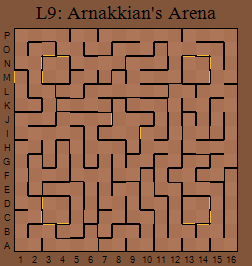
This is reached from location M16 in Labyrinth IV. You arrive at M1 and can return the same way. Read tracks shows nothing and that's because there are few encounters. Those that you will have are minor, hardy clerics, silver ogres and a few wimpy were bears. Anyway, go to K2 and, if you go east, you'll teleport to K8, which will also take you back. At I8, you'll learn you're at the nexus of the Arena. What is the Arena? Evidently, it was a place where, in the time when Arnakkian bestrode the land of Twinion, the bravest warriors and wisest mages could do battle. Four gateways lead each to one staging area - the Red Arena from K8 goes to M4, the Blue Arena from I7 to D4, the Green Arena from H9 to D13 and the Yellow Arena from J10 to M13, each staging area has two doors in and two out, all one way.
This level was used as a dueling area in the 1990's, but sees little use now - most duels occur in the dungeon entrance.
Level 10 - Elf Villages
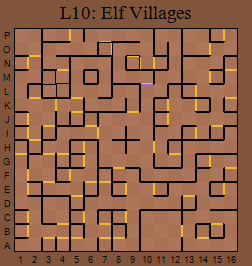
Out of the Labyrinth at last! You arrive from Level 9 at I5 and can return to Castlegate the same way.
Several villages lead off the central area. The one we entered by is identified by a sign at l10 which says "To the Cave of NeedleWood". Once you have the Elvin Cave Key from the Land of the Giants, return here and use it to unlock the door. At M3 is a fight against Sabretooth Lions and Black Dwarf Knights for a Rainbow Yel and at L4 a fight against Nightmares and Dragons for Cleowyn's Bones.
We know we have to put these back in the Mausoleum so it's back to the top levels to collect Cleowyn's Ring, Robe, Crown and Sceptre (oh no, the Rune Room again!). I'd thought I'd just be able to enter the inner Mausoleum but, no. At least the fights were a load easier this time round! When you reach Cleowyn's Tomb at O9 his spirit complains that you took a long time but he gives you a Netherworld Medallion and says not to bother him again.
At H11 another written in the dust of pine needles says "Wilderness of PineCone". Inside a typical elfin dwelling at J11 you'll see a mural on the wall showing carvings of elfin rangers crossing a glacial landscape. There's also a big fight against Shapeshifters and wizards. This mural is repeated in many dwellings and, in others, young elves scatter and hide as you enter.
Going through K9 you enter the Wilderness of BeechWood. The Aldbora Tree sheds its golden leaves around M6. In a room at I1, Frenank, hunter to the Elf King, says it is known in the trees that Nature's Robe must be used for the harvest. Collect this before you start this section or, like I was, you'll be in big trouble because the game expects you to have the robe first.
Down the corridor that starts at F11, you'll find the entrance to the Land of the Dwarves at I16 but it will not open until you are at Level 30.
Down I6 you'll enter the Wilderness of OakLeaf. This splits two ways. At C1, in a room, you find the storyteller Sorshian who honours your arrival, and tells you that only when it's winter will the Aldbora shed its fruit. The Clerics of Oakleaf are at D4 and tell you they comfort the seasons. This character is Summer. Use the Harvest Horn. He accepts it. Summer is mellowed by the sweet music and it is now Autumn. You gain Autumn Seeds.
From messages in Arnakkian's Great Hall, you know you have to take them to Winter. In the top corner of PineCone, at O13, you meet another of the Seasons incarnate in mortal form. Yes, it's Winter. Use the Autumn Seeds on him. They wake him from his long hibernation. He is Spring again! He says to take the Renewal of Spring and rejoice with him. (NB Spring is now in this location).
A hard fight will slow you down at N2 but when you get past, you'll meet, at O1, the Wise ones of Beechwood who serve the Seasons. Dirsty Bombat, vassal of Autumn greets you. Give him Spring Renewal. You gain icy Winter Waters as a present. (NB Karakiar is now here, whose liege is Winter)
Make a detour to the tree. Because it is Winter, the Aldbora Tree shows its age and the fruits of Knowledge are now ripe.
Another area at F8 is the Wilderness of MapleBrush. Varstad, counsellor to the Elf King is at B14 tells you the magic Aldbora requires Summer radiance to shed its knowledge fruit. At B10 you'll meet Spring, one of the Wardens of Maplebrush who hold the Seasons. Give him Winter's Waters to change him into Summer and you gain Summer's Radiance.
Go round through Exodus etc and collect another Harvest Horn. Take it to Summer who is back at D4. Give it to him again to get more Autumn Seeds. Return to Winter at O13 to swap these for Spring Renewal. Back to Autumn at O1 and exchange Spring Renewal for Winter Waters. Back at the Aldbora Tree, carrying Summer Radiance and Nature's Robe, you now don't get a message. The fruit has been shed - but where's it gone?
A message appears saying that the leaves whisper that you must defeat its enemies, the four winds, South, North, East and West, and you will find a precious gem as green as my foliage. You also get any skills you didn't already have.
Head back to the Wind Knight tombs and defeat the winds in this order - F2 (South), B2 (North), H2 (East) and D2 (West), then up to M1 and the gathering of winds. The fight there should give you a Green Gem if all has gone correctly.