The Labyrinth (Introduction)
There is a lot of to-ing and fro-ing between the four levels of the Labyrinth. You'll begin in the Labyrinth I, sometimes referred to by NPCs as the Labyrinth Attic. Below is Labyrinth II, III, and IV.
Each of these distinct areas of the Labyrinth have secret doors, teleports and pits, taking you from one level of the labyrinth to another. It may seem very complex at first glance, but you'll soon be very familiar with certain routes through the levels. So that's the way I'll be laying out this section.
You may find you are not strong enough to take on these deep levels of the dungeon. I did! I found all my routes blocked by monsters which were too hard for me. I was then on Level 24. So I spent two evenings building up my character by repeating one of the fixed fights. The one I picked was the one on Level 8 at H13 against minotaurs and wereminotaurs. They aren't too tough, the XP are good and so is the treasure. It happened again at Level 26/27 so again I spent two evenings bumping off the same monsters. Further on, fights against gangs of Liches and ghouls in Castlegate are manageable and lucrative with about 20,000XP each time. Luverly!!
Labyrinth I
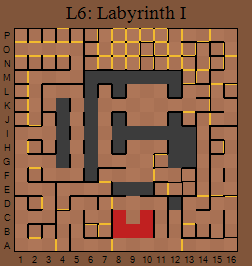
Labyrinth I is reached from The Thieves' Den from both sets of stairs, arriving at L14. The door nearby at K14 leads to the small room in the Dungeon Entrance L1 behind the Thieves' Door. Note that all Quest items relating to the Palace are taken from you as you go through this room, plus the Thieves' Key.
You are welcomed to the Labyrinth by an NPC at K12 - looks like there are several levels to go, and some very tough fights. The one at H11 is a lulu with hellhounds, gargoyles and other monsters in a gang! I managed it at Level 37 by casting Death Darts first to kill the hell wolves, Control twice, then using Fireball and Death Darts to finish off the other monsters.
You notice something strange about the wall at L7. This will later be a teleport to Level 9, Castlegate, once you've used the teleport to get up to this level from there. It'll be a while before you can use it though!
There are many pits in this area and various fountains. The Windybless Fountain heals your wounds at J13 and the Nightwillow Fountain, reached through a series of one way routes through vanishing/appearing walls, restores your mana at F13.
One NPC warns you not to jump into those pits which don't have a floor beneath them; that is the way of the Labyrinth. You could test this theory by diving into any old pit but it is best to wait until you have visited the next level down and used True Seeing so that you can guess which pits up here will land on solid ground.
When you arrive at G8, a voice echoes through the winds, saying you have travelled far and he laughed when you troubled Cleowyn's ghost, but now you enter his tunnels. You are told to go back whence you came; the Winds will keep these places clean.
From here you can go through two routes through the Labyrinth and the surrounding maps. The first route, which will start with Sirocco's Door, will be covered in this part of the walkthrough. The second route, which begins with the pit at I11 and heads into the Mage's Overlook, will be covered in the next part.
Labyrinth Route 1
Sirocco
Sirocco's door at F7 won't open until you kill Sirocco, a lich who resides at E11 with a group of Silver Ogres. A corridor behind Sirocco's now-open door leads to the door of Zephyr at D4 which is a teleport to The Labyrinth II arriving at D4.
Labyrinth II
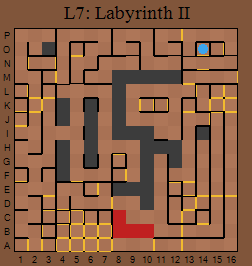
The door at D7 leads in to an area of pits and lava where Zephyr's Winds gust, causing you much damage. Restore health and mana as necessary after every one or two steps. Zephyr will apologise at C11 but says he is sworn to serve the Wind Elemental. He asks you to return the Harvest Horn to his wyverns to release his bonds. From here you can go two ways - down the pit at H11 or the door at B11.
Labyrinth III
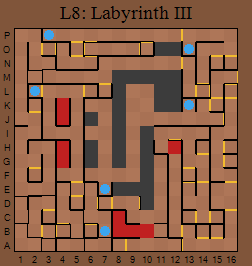
Jumping into the pit at H11, you will arrive at Wind Hollow H11. Don't be tempted to go through the door at I12 - it DOES open into a lava pit. Depending on your race, you will be able to open one of the doors along this corridor. My Human character could enter the room at F13 through the door at G13 and gained increased initiative in combat.
An NPC will tell you near here that he found an interesting tapestry near one of the dwarven teleports. It had a picture of a great moon, just like the one in the sky but different. Make your way to the door at E13 where, you're told, dry desert winds burn your throat as you look down the winding passages leading to ZZYZX. Enter to arrive back up to Labyrinth II, E13. You will take some damage each time this door reopens as the wind hits you. A door at J14 leads to Wyn's Sanctuary back in Labyrinth I.
Wyn's Sanctuary (Labyrinth I)
To enter the lower right corner of the area, you'll need to travel through Wind Hollow in Labyrinth III and along a passage in Labyrinth II. This is called the Wyn Sanctuary. Info will tell you that the feeble survivors of Arnakkian's Experiment harbored hatred towards those who found home in Wyn's Sanctuary. An inscription will also inform you that the labyrinth and lower levels were first explored by Arnach of the Snow Elves.
So, what is in Wyn's Sanctuary? There is a secret door in the west wall at H16 behind which you will enter a tough fight with Commanders of the Wyn Ogres. After you win, you'll find a note by the exit, written partly in runes. Translated it reads, Red, yellow, green and blue. That is the order of the gems. Signed Last Wyn Survivor, Kanasgwyn.
The Leap and Wyn's Fountain
At D12 a pit leads you to The Leap on Level 8 where you are warned you'll meet dragons. Too true! There are major fights in C13, D13 and a biggie at D14. This last one is against 6 Dragons, at least. But you'll win various goodies including Voranti's Key. The pit at the end of the corridor takes you down to Wind Hollow on Level 8, I14.
Make your way around the bottom left corner. On an area surrounded by lava at C9, you will disturb a band of Sanctuary Guards, whereas a room at B7 houses a nest of dragons who sneer that the Sanctuary belongs to them, before they attack. The next room houses Wyn's Fountain - it may be old and cracked but its magical water improves your speed in a fight.
The Wind Knight's Tomb
Winds pound furiously at the door at A4 and it can only be unlocked with the Wind Knight's Key which is gained at O6 on this level. As you unlock it, the soft winds seem to whisper "Beware, those who seek the treasure of Wind Knights' Tomb".
Most of the fights in this southwest corner are restricted to dead ends. At K3 you'll hear the tempest whisper that one's treasure comes from the direction of the winds and at L5, facing north, skeletal voices echo "Only forces more powerful than all four winds can open the door" - but there is no door visible, even using Detect. Could these messages have something to do with the four rooms here at B2, B4, B6 and B8, the doors of which each face one of the cardinal points?
Yes, it does! Each room is related to a wind, depending on which way you enter the room, and contains a phantasm or two, a lich and several other monsters. For instance, from the room at B2, entered north, the North Wind blows a wintry chill and as well as the phantasm and lich, you will encounter polar bears. After winning the battle, you're told the wind has been quieted. Defeat each wind - the hardest is the one behind the door at G2 with gargoyles, a lich and phantasm - and go back to L5 and a door will appear. Voices will say, enter the Tomb of the Wind Knights if you dare but, if you have any honour, do not disturb our bones.
Inside are many rooms, each containing spit spiders or nightmares and Wind Knights. These are hard fights but don't give much treasure. Maybe that's where the 'honour' comes into it? If you want to come this way again, you have to defeat the winds a second time - a real pain. A message at O1 from Morgard, ArchCleric, shows the knights were part of Arnakkian's army. It says "The last of Arnakkian's Knights have been buried. At last I can tell my secret. I waited as Arnakkian challenged the time elemental En-Li-Kil and lost. His greed for immortality cursed us all." The final room I entered was M1 and this told me that the Four Winds gather strength once more and throw bones against the wall - a very tough fight of Wind Knights and representatives of the four 'Wind' rooms. We'll be back here later.
Moon Hollow
The room behind P4 contains a teleport, not a tomb. It leads to Moon Hollow at Labyrinth II, P4. (You can also take a short cut to Moon Hollow by jumping down the pit at Level 6 I4.) At some locations (N6, O6, F2), 300 mana will be drained from you by the Moon Hollow Winds. Don't try to restore mana when standing there, desperately trying to replace it - it will keep draining!
When you walk south at M4, a wall forms behind, but, to compensate, the wall at M5 vanishes. Warm updrafts rise from the pits at L6, L7 and K7.
There is a secret door in the wall at H8 with cyclops and giants behind. More useful is the fight behind the door at F9; you'll find a paper on entry which says "Help! My brother Orilon has been bitten by bears and is transformed, signed Margery" and after a fight you'll find some good armour (I got a pearly breastplate) and a Jack of Spades.
Past the dragon and wyverns at E2, you'll find a secret door in the north wall at E1. You're told you can see the signature of the spectrum on the wall but Detect doesn't show anything. However, in a fight at A3 I found an Omniscient Prism and using this at E1 revealed the door. In the room behind it, F1, I found the Moon Prism, a quest item.
There's another secret door in the wall south of D3 and werebears behind it - a very hard fight.
More werebears are at J1 and J2, again they are hard to pass, especially when they keep petrifying you. You can be dead before you strike a blow.
There's a hidden area in the top left corner accessed through which I think relates to classes other than Knights since there are 5 such hidden rooms on this level plus one only Knights can enter (which I'll note later)
Castlegate Bazaar
In the top left corner, past yet another gang of werebears at M2 is a pit at O3 which leads to Castlegate Bazaar Level 9 O3. As soon as you enter, you'll be warned about tough fights by a cleric who says you must do something about the trolls. A knight hiding in a barrel at N1 is very pleased to see you too. At D3 you'll drink from the Elffoot Fountain to gain the Channel skill.
You'll get two very useful bits of info; "past the Castle Gates and past the Elves you will find a place where the blue light of the sky meets the underworld below" and at a gypsy stall, "it is written on the Lava Walls that a hero will one day reach the end of the rainbow and confront time. Go now, before more trolls come!"
Ah yes, the Trolls! There are lots of small rooms in this area, some empty, some containing Blue Troll Knights. One, at B3 contains a fight against Blue Troll Knights and Phantasms, after which you will gain a piece of blue metal. This is used in the Land of the Giants (see later)
To leave this area, go through the north wall at E6.
Exodus
The pit at I6 drops you to Exodus on Level 8. This was so named by the survivors of the Cataclysm. Here they escaped the horrors of Arnakkian's Castle and began their subterranean life.
Exodus is surprisingly restful after the rigours of the earlier sections. Many random fights but none too hard. You arrive at I6 and a fight against Orange Orc Knights at K6 will net you the Key to the Back Alley. A ranger at F6 tells you that there is a great river in the dwarven lands below. It seems to lead to a great chasm she could not cross, and a mage told her the chasm was called the Ageless Void. She says to be careful in the great river as it drains your health for every step you take.
The Infinity Fountain at E7 restore your mana and the Charter Fountain at K13 restores all your health. Steam vapours arise from the pits by L9, L10 and K10. An access shaft at J15 leads to The Drawbridge L9 and a door at M16 to the Great Hall.