The Prison
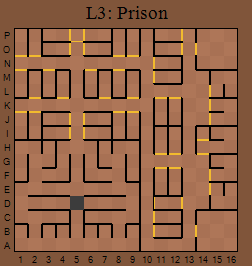
You will drop into this area many (many!) times from the trapdoors in Cleowyn's Palace. There's nothing for it but to trudge back up as exits from here are few. Get back by using the Pit at D5 to the King's Domicile and the elevator there to come back up (see those sections).
Info is patchy. One Troll Cleric tells you there must be an exit, stairs or teleport. The 36 cells are empty except for spirits. An Orc Ranger tells you that some have escaped the dungeon. If you find the rainbow bridge, you are near the exit. Another NPC tells you of the Wizards' Challenge (you'll find this at the Great Corridor on this level). It was created by two wizards to challenge the brave. It's on this level but you can't reach it from the Prison. Know that race and guild must work together if the challenge is to be overcome. Another adds that a challenge awaits the brave if you dare continue after finding what the guard Deldwin desires (referring to the fact that the Challenge is further down the corridors where you find the King's Pass). He also says that Chaos should walk with Chaos and Harmony with Harmony to find the rewards. The only other thing you will learn is that the Palace was built in the volcano as the King wanted to learn the secrets of the wizard Arnakkian. Many of the stones that form the Palace were taken from the wizard's castle which is why the dungeon is cursed.
So, what is here? Not a lot. Some doors can be opened with a blue lockpick (see my comments earlier about choice of lockpicks), many more forced open. There are monsters of all sorts, some easy, some tough. I had a major battle at I16 but only won a lousy orange lockpick! The most useful place to find is a teleport at D11 which leads to the Soldiers' Quarters C13 which leads to the main area via another teleport. A useful short cut.
Rune Room
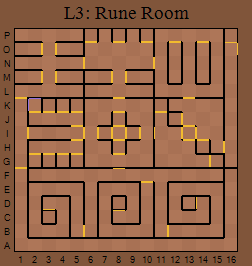
You will enter this section from either The Great Corridor or the Palace Corridor. A long corridor winds round three sides but you have to explore it in two sections. There are also six main areas above, all of which have locked rooms - without keyholes.
An NPC will tell you that there are a lot of secret doors in this area but he can't work out the correct sequence to open them. He wishes he had a more complete map of the area. He also says you won't get anywhere unless you have the King's Ring. Another says that once you find a key in this area, seek the hidden door and follow your destiny. The door appears only when you have the right key. Where it leads he doesn't know. A third talks about the Mausoleum. There are many ways through it but few are rewarding. The most direct ways are the most challenging. You are warned not to continued unless you have what the King demands. (This, we know, is his robe, crown and sceptre). A fourth tells you that beneath the King's living quarters is the Thieves' Maze. Only a thief or one with thieves' skills will pick his way through it.
Tapestries at K2 give useful info. You must take the crown, robe and sceptre to the Mausoleum and use the correct niches to open the true path to the King's Tomb. The other says to go west, but not farthest west and give the crown when you can go no more. Go east, but not farthest east and give the robe when you can go no more. When crown and robe are given, continue to the door of the tomb and give the sceptre there to be rewarded.
From our fight with King Cleowyn and the info we got from the tapestry afterwards, we know we are looking for a two-faced Y. Check your map. Ah ha! In the middle of the map is an area that looks like two Y's joined together (if you close your eyes a bit and squint).
The Center Switches and the Rune Vowel Keys
The four doors in the center of the map are sealed shut with a bas relief of a royal ring. They will only open if you have the King's Ring. Inside, you'll find four switches which you flick by facing them. Each of the four interior switches will open some of the locked areas within this map.
Proceed through the center switches from East to West (Right to Left). You can now walk out the westmost door in this center area, and from there to O1, where you'll find the O Rune Vowel Key.
Now return to the center area and walk through the center switches from West to East (Left to Right). You can now walk out the northmost door in this center area, and from there to M10, where you'll find the I Rune Vowel Key.
Now return to the center area and walk through the center switches from West to East (Left to Right). Walk out the northmost door in this center area, and from there to M10, where you'll find the I Rune Vowel Key.
Return again to the center area and walk through the center switches from South to North. Walk again through the northmost door in this center area and then to M14, where you'll find the E Rune Vowel Key.
Now that you've found the rune vowel keys, you'll notice that facing south at G8 will make a door appear in the wall. Through this door are three more areas, each with a locked door unlocked by moving through the center switches.
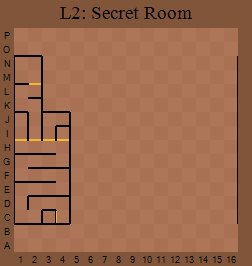
King Cleowyn's Scepter
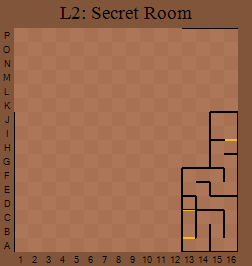
Return to the center switches and travel through from East to West. Face south at G8 and a door will appear in the wall. Travel through and head east and south, entering a tight spiral in the south east portion of the Rune Room. This will lead you to the first of three Secret Rooms. In the Secret Room, follow the yellow path through a door which you will have to use one the I Rune Vowel Key to open. Follow this path to J16, where you will receive King Cleowyn's Scepter.
King Cleowyn's Robe
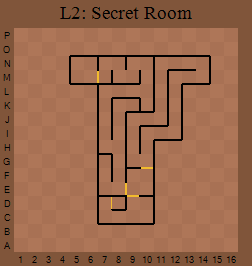
Return a second time to the center switches and travel through from South to North. Take the door at G8 and this time enter the spiral in the middle-south of the Rune Room. This will lead you to the second Secret Room, where you'll use the O Rune Vowel Key to open a locked door and then find the Robe at M5.
King Cleowyn's Crown
Return a final time to the center switches and travel through from West to East. Take the G8 door and enter the south-west spiral. Here you'll use the E Rune Vowel Key to unlock a door, and finally find the Crown at N1. Congratulations - you have found King Cleowyn's Vestments and may now complete King Cleowyn's Quest in the Mausoleum.
Great Corridor
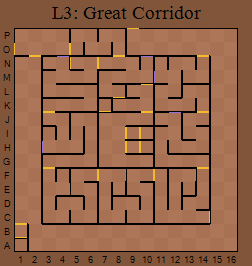
This can be entered from the Rune Room and has exits along the outer corridor to the Mausoleum and, past a guard who we were told about earlier, to The King's Domicile - my favourite area ... you will find out why later. You need the King's Pass to get past him and you will find that in the centre area. This can be reached by teleport from The Basement and has a teleport in it to another part of the King's Domicile. Otherwise you can enter from a door along the north wall but you will need to trek round to it. Several tapestries give info as do runes by doors. Basically you need the King's Ring, Lockpick and Key to be able to travel around freely. Later the King's Domicile Key will open the door at O8 but we haven't got that yet (well, I didn't!) In the centre area is the Wizards' Challenge. Unlocking doors and fighting, make your way around. Certain tapestries will only be legible if you are of a certain class or race. Fight at E8 for the King's Pass. Note, you'll need several to complete the game as Deldwin wants one each time you pass him, but you can't win another one until you have used the first. There are a few one-way doors too, just to make life complicated.
I played as a human knight pledged to Harmony (Mr Nice Guy) so this is what happened to me. At I7 I was told I had mastered the Challenge and was told to enter the door of Harmony. (Similar blurb awaits those of Chaos at H7). The door is at I8 (and for Chaos at H8). Inside I8 are two rooms, each with a big fight. I used Control and Poison Cloud with healing when necessary. The second fight, at I10, is the bigger of the two. Of course, you have to go back through the first fight again on your way out. Head to J7 and a door will open in the north wall. Inside is a MAJOR fight with wyverns and demons. Good luck, you'll need it. But when you win, you'll get a chess piece inscribed 'Property of Arnakkian Slowfoot'. Useful or what ...? Being a coward, I didn't try the other door marked for Chaos!
The Mausoleum

A door leads into here from The Great Corridor and a teleport will bring you here from The Hall of Doors.
An NPC tells you that if you find Cleowyn's Quarters, you will find a short cut back to his Palace. But be careful when you use it that you don't leave his quarters unrewarded. Another says, Cleowyn's bones are guarded by snow elves. Whether or not it is worth returning Cleowyn's bones to the Mausoleum is much debated for the imps will seize them again and return them to the elves.
Another NPC says, the longest routes through the mausoleum are the least rewarding. Very true. There are four exits from the entrance room (plus the one back into the Great Corridor) and the routes that lead from the ones far left and far right merely wander round the edge of the central area. We learnt from the tapestry in Cleowyn's palace that we must go west but not furthest west etc and this means to take the lefthand exit of the two on the north wall since this isn't the 'furthest west' exit from this room.
We are now ready to complete the King's quest. But there is one important point; one NPC will tell you, beware when you place the possessions Cleowyn demands. Use crown before robe before sceptre. Someone in your group must remain in the Mausoleum until the three items are placed and the tomb opened or imps will steal the things. So once you start this quest, DO NOT LEAVE THE MAUSOLEUM, not even to teleport up and buy supplies. Stock up well on potions, scrolls and what-have-you first. If you leave before the quest is completed, you will have to go through the rigmarole of getting the crown (or whatever) again, plus whatever rune keys you need ... I did this, and it ain't funny!
So, go through the door at D8 and head to J7. The Crown is taken from you and you hear a rumbling in the distance. Back to the main entrance and, remembering the tapestry again, go 'east but not furthest east' through the door at D10 and head to H9. The Robe is taken from you and a door opens to your east. Head through here and go to M9. The Sceptre is taken from you and a door opens north, you are invited to enter and take your reward. Warning, this is a one-way door so explore to the west first, not that there is much there ... Okay, though the door at M9, you will get into a big scrap at N9 and, surviving that, enter the Crypt of King Cleowyn at O9 where you get a range of goodies (though frankly I would have thought something more spectacular was called for after all my hard work - I got a Sword of the Crypt, Mourning Star, Bow of Sorrow and Galabryan Chainmail). After taking this, a note here warns that the King's bones have been given to the dwarves to grind into powder. Cursed be ye who try to return his bones to the crypt.